
CARUSO PRECISION
AFTER ACTION REPORT
_________________________________________
Caruso Precision
Advanced Competitor Class @ Twisted barrel Precision, little rock, ar
Dates: June 27-28, 2026
Instructors: Matt Caruso & Thomas Crosson
Student: Zach Young
Purpose: Assess performance, provide live critique, feedback, corrective actions, and develop personalized training plan
SUMMARY:
This report provides a comprehensive review of the recent training class from multiple sources of insight and performance data. Trainee feedback was actively collected and analyzed to understand their individual perspectives, challenges and takeaways. Additionally, I’ve incorporated my own instructor observations gathered throughout our time together, with particular focus on engagement, progression, and skill application during drills, exercises, and match conditions.
Performance in the match setting was critical to assess how effectively the trainee executed learned skills under pressure, and to identify any recurring gaps or strengths in real time. Taking this all into account, I’ve developed a personalized training plan for each individual. These plans are informed not only by the data collected during the course, but also by my own personal experience as a competitor and an instructor.
The goal moving forward is to ensure that each trainee continues to build on their strengths while systematically addressing areas for growth using methods that are practical and tangible. All training elements have been tested and yield a form of measurable results. Training means more than identifying problems but offering no solutions. This plan is a practical guide for the next steps in achieving your goals. It is a standalone tool by itself, but I have also integrated links to relevant training within my Virtual Instructor Program where it would help correlate and add direct context. If you don’t have a membership yet, it would help, but is not required. If you’re interested, everyone from class will receive a 50% off opportunity to get access to that program along with notification of this report.
If anything in this report is not clear or requires further explanation, please reach out.
OVERVIEW:
Thank you again for joining this class! It was very rewarding to watch you connect the dots and make progress throughout our time together. Each trainee comes to the event with varying levels of skills, abilities, strengths, weaknesses, and how much room they have to grow. In addition, everyone learns at their own pace. That said, you may have walked away with one little insight, several huge breakthroughs, or something in between. No matter what, this training was not an ultimate solution, but a place to better equip yourself as you continue on your journey. Everything you picked up, changed, validated, or completely rebuilt will need to be practiced and worked to get the results you’re striving for; the work is not done!
We reviewed basics, enhanced fundamentals with advanced techniques, refined sophisticated skills such as movers and tripod operation, as well as dissected deep cerebral topics such as spotting and wind reading. We exercised drills to lock in specific muscle memory, and also to expose you to new concepts. Topics the class asked for and were covered were:
Wind
Spotting
Positional Techniques
Tripod Techniques
Mental Planning & Stage Prep
Time Management
After each topic was covered in class setting, we took it to the firing line to hone in on the physical skill and techniques behind each topic. I was happy to see everyone participate even when the guidance didn’t necessarily make sense or seem significant at first. As an advanced shooter, there are some philosophies and simple concepts that are staples for progress, for ALL. A few of the mantras throughout the training were:
“Small changes can make large improvements” – lots of the teachings are subtle differences that can significantly clean up your execution, giving you better first round impacts, spotting, consistency, etc.
“Pause” – As simple as it is, this is often the critical missing piece to consistent performance. Rushing through the process may work for a while, but eventually you will face an issue and likely moved too fast to properly manage it.
“Slow down and process what just happened” – Similarly to the one above, this focuses on the follow through in the shot process. Are we actually watching with an attentive brain as we make the shot? Or are we just waiting for the bullet to land so we can quickly cycle to the next shot?
We covered a LOT of material. As we discussed in class, not every insight needs to be incorporated into your process, but take as much as you can and see what yields the best results. No matter how our 2 days unfolded for you, the goal is to take what we covered, combine it with some pointed critique, and propel you on a guided path forward toward your next goals. Let’s get into your personal report!
SHOOTER GENERAL:
Coming into this training with a nice amount of match experience has served you well. You may not have seen it all yet, but you certainly are comfortable with most typical engagements and know how to get prepared for a stage. Your confidence is an asset, but regardless of a solid plan, we have to be able to execute and adapt on the fly. I have things we can work on so that the confidence stays strong throughout the engagement. Let’s fill in the cracks…
STRENGTHS AND SUCCESSES:
Self-diagnosed Pre-Training Survey:
Ability To Shoot A Stage Quickly -
Your pre-training survey shows this as an asset and a shortcoming, unless it was a typo, you put this answer for your weakness as well. I actually really like that analysis, and if it’s what you meant to do, I would agree with it! Being able to shoot fast is a blessing and a curse. While it gives you the ability to crank it out, it can also lead to moving too fast through things that need more attention. The great news about this is that in my other profession, it’s become very apparent that it’s always easier to slow someone down than to push someone faster outside of their capacity. This attribute will serve you more than it will hurt you.
Instructor Observations:
Fundamentals-
Overall your fundamentals are in a great spot. Not much low hanging fruit there, just a few clean up items that most people have - the occasional trigger slap, or a center of gravity slightly out of position. Look for those opportunities to fine-tune wherever you can. Each small improvement has a nice trickle-down affect, such as removing a slight center of gravity leaning down into rifle. If you get more upright behind the system, you’ll better avoid any body fatigue, the rifle will do better to track straight backward, have less muzzle jump, and ultimately better spotting.
Engagement Cadence (Positive)-
You have a nice flow throughout the engagements, moving in a smart order from shot to shot. The main things I noticed were a natural order of dialing before you move, and swift movement from one step to the next. You know how to shoot, reference your dope card, dial, move, set up nicely, get on target quickly, and get into the next shot. This is a simple but crucial piece for success in what we do. Those who have to think hard about each step or slow down, will have a hard time keeping up. The ultimate goal with this ability now is to hone in on a few more efficiencies, and find the upper limit of speed to prevent rushed issues from developing.
REFINEMENT OPPORTUNITIES:
Self-diagnosed Pre-Training Survey:
Ability To Shoot A Stage Quickly –
As mentioned above, this is the other side of the double-edged sword. Being able to go fast can often lead to going too fast when you shouldn’t. It is certainly something to be mindful of, but again, better to slow someone down than force them to speed up; we can work with that!
Stability -
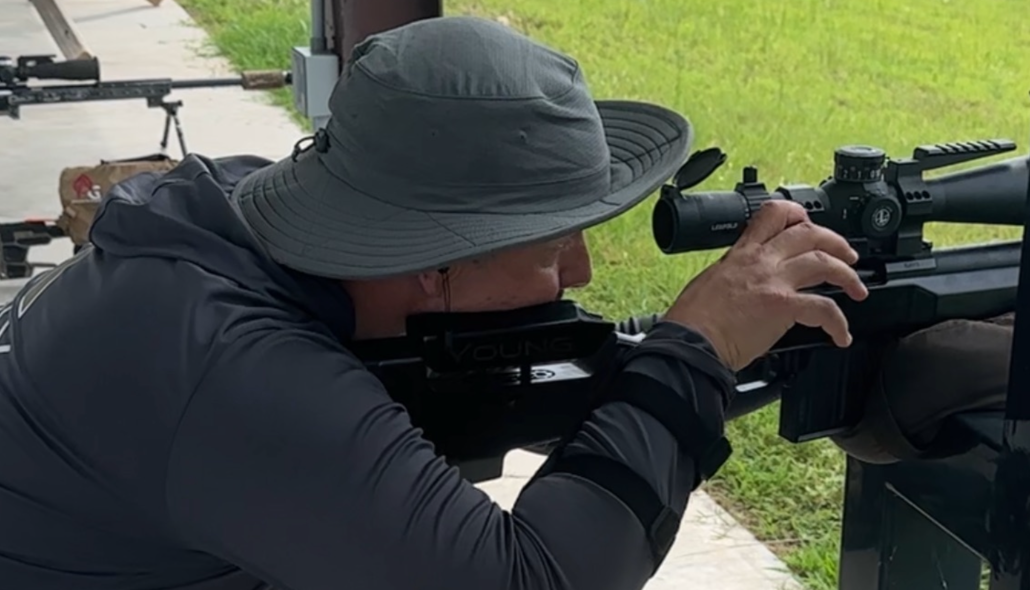
Of course I can’t see through your scope, but I can see how your rifle moves when you’re shooting. I think the biggest thing to adjust here is the work in the bag. I didn’t put us on anything unstable, so I’m guessing you were pretty solid for the most part. That said, reviewing some footage, I can see some good muzzle jump or muzzle flip on most of your shots. This doesn’t have to be detrimental, but it’s an indication that there’s more you can do in the bag before taking the shot. I’m kind of reverse-mathing a recoil symptom to help address the potential instability, since the cure is usually mostly the same.
Speaking in terms of stability on a scale from 1-10 — It’s pretty easy to go from 1 to 5, or even 6 to 8. But it takes a very high level of meticulous attention on multiple levels to maximize stability from 8 to a 9 or 10. It’s not hard, but it takes that last level of mental and physical capacity to have the thought, and then the physical patience to do each item near-perfectly:
Bag orientation
Bag placement
Separately place rifle
Large sawing down
Appropriate level of shooter interface
Fine-tune shimmy final point of aim onto target
Smooth bolt manipulations to not jar the system.
If you put attention in this area you will see significant improvements in several of your targeted areas of improvement.
VIDEO SUGGESTIONS:
https://www.carusoprecision.com/vip-core-skills/v/positional-shooting - 15:50 and 20:00 timestamps for reference, focusing on recoil management and bag techniques
Tripod Confidence -
I really appreciate the honest feedback here in the survey, because a lot of people quickly want to answer that they’ve got it figured out, and/or don’t like tripod so they don’t care about it. It has proven itself a phenomenal tool for long range shooting, with multiple real world applications. It may seem ridiculous at first, but once you get the hang of it there’s no arguing it.
I liked what I saw from the drills we practiced, I could see you working through some of the techniques we discussed. I didn’t catch a lot of direct feedback from your drills, So I will include a pretty full run down below in my observations.
Misreading Wind -
Proficiency in reading wind is a long game, there’s just not many ways around it. However, that flow sheet I gave everyone is a really good guide to staying focused on the conditions and how to quantify them. I’ll put a drill in your training plan to work on this, but it really comes down to trial and error, coupled with investigation and reverse engineering. I have spent a lot of time studying conditions in a spotter, coming up with a plan, testing it, and then dissecting what I missed, or what environmental conditions/indicators WOULD have given me the right answer had I seen them or put more merit on those factors. Sometimes it was mirage that was misleading when the grass is a better direct indicator, or vice versa.
One of the base level approaches is to NOT just use what you get on your kestrel, but to pick a near, middle, and far wind call. Use the kestrel for near, down range indicators and mirage for middle and far zones. Change the focus on your binos/spotter to better “choose” what range you’re reading mirage at.
The second level is to take a plan that was made under calm mental conditions, and then take it the rifle scope - give yourself a timeframe, and work to quickly and simply analyze, then confirm or adjust, ending with a shot. Then armchair quarterback the results; that is where the long term learning will occur.
VIDEO SUGGESTIONS:
https://www.carusoprecision.com/vip-core-skills/v/wind-pt-1 - main focus on mirage and downrange indicators for a quicker call on direction and velocity by eye.
https://www.carusoprecision.com/vip-core-skills/v/wind-pt-2 - gaining a quick feel for when angle matters more vs. when velocity matters more - quick call by eye.
Instructor Observations:
Engagement Cadence (negative) -
So this is where the ability to go fast can bite you. Coming from my own experience, I’ve always been a fast shooter, and over the years I’ve had to pump the brakes at several specific skills to better address the situation. The results have been incredible - but learning things going fast is super tough, and slowing down allowed me to focus on the exact item I was working on, get better, build confidence, and then accelerate back up with a more solid ability all around.
For you, the biggest speed issue I see is the shot sequence itself. I wouldn’t say its a major problem at all, but it’s the area I’d like you to focus on the most. The big mantra of “move fast, shoot slow,” is big for me, and for quick guys like yourself it’s easy to do once you commit to the adjustment. When you are able to move quickly, you buy back several seconds per stage, and can put that surplus to better use in the glass on target. What I saw, was a frequent tendency to shoot a little too quick after the bolt closes, and furthermore, the follow up shots were usually even further outside of the pace I’d prefer.
After I close the bolt, I’m scrutinizing my level of stability, reviewing the target for blading and impact markings, scanning the backdrop thinking about what a miss will look like, and pushing out a final breath while shutting down the rest of my brain in preparation for hyper focus on the follow through and spotting. This can be done very quickly, but still requires a pause, anywhere between 1-3 seconds. I try to work that in on my first 2 or 3 shots depending on how much things are changing (conditions or different targets). Once I see the shots, process what worked and any adjustments I can make, then I can start accelerating with that knowledge and confidence. The worst feeling in the world to me is when I hit or miss with NO idea of what happened, even though conditions were favorable to see it. Whether due to instability, bad recoil management, poor spotting, mentally not ready, or that I was rushing to run the bolt before watching downrange - I will kick myself because taking those shortcuts will definitely end up costing me more time retroactively troubleshooting versus just taking my time in the first place.
I would encourage you to work a more intentional pause in your shot sequence, especially in the beginning of the stage. Even further into the engagement with confidence, I might be moving faster through that pause, but I don’t eliminate it completely. I still try to shoot>freeze>spot>correct for EVERY shot. The one exception is if it’s a hail Mary at the end of the stage and you know you’re about to time out. Then, I might go full auto! The biggest thing is to train yourself to pin the trigger and stay there until you’re done thinking through what happened down range. You can run the bolt fast enough that it doesn’t have to happen right away. I’ll put a drill to work on that in the training plan.
Tripod–
Overall for your level of experience I’m actually very happy with your tripod ability. This is just a next-level skill that I think needs to be practiced for all. It’s easy to get behind one casually, and get a false sense of confidence. Put that same person on a clock with a tripod they’ve rarely practiced with, and watch the wheels come off. There will usually be one or two stages per match that will challenge the shooter to make the tough decision: bag only, or tripod? It can usually be done either way, but the better tripod shooter will prevail statistically more often than not.
Being able to quickly set up on target, and iron out any stability wrinkles is a HUGE asset, and it’s really not hard. But it takes practice for familiarity, and guidance like my class to show you what you’re looking for. You’re in a good spot with this but I would highly recommend making it be a casual-confident-comfortable tool in your belt. This way when the crossroads present themselves, you can make a solid decision on if you can smoothly handle it with a tripod or not. The big considerations are:
REAR LEG SUPPORT
Pros/When To Use It:
Unstable prop or very small shooting surface
Smooth floor surface (wood, cement, fine gravel, grass, dirt…)
Targets reasonable close in direction
Multiple and/or small window positions where it takes meticulous care to thread rifle all the way in and out of position
Cons/When To SKIP It:
Prop is maybe a small surface, but super stable and potential for a vertical brace to smash bag position up against for more stability
Chunky gravel or awkward surface, possibly too much stuff in the way of a casual placement of tripod feet
Large awkward pan between targets
Even if lots of positions, if they’re big and open for a chop-down drop of your equipment, plus any of the other factors above, bag will probably be easier.
Considerations:
Sturdy tripod
Good tension on leg hinges
Height set to avoid knuckle tensioners
Height set to promote stability - tall enough to get in, but not maxed out unnecessarily
If able shoot in direction that promotes pulling equipment
Line up strong side of target and make final fine-tune point of aim via pushing support leg into tripod base
DON’T pull against support leg - tripod WILL tip causing floating feet!
TAC TABLE SUPPORT
Pros/When To Use It:
Unstable prop or very small shooting surface.
Few positions, and/or all the same height.
Demand for high level precision off small surface/unstable position - such as a KYL.
Cons/When To SKIP It:
Unstable tripod with skinny legs that will twist and torque under pressure - will induce nonstop lateral wobble.
Lots of movement - tendency to drop bag and have to pick it up several times costing too much time.
Too much height variation in ground or prop positions that a confident tac table height can’t be guaranteed.
Considerations:
Make sure everything is tight on tripod and ball head
Leave a 20-30° tilt on table to allow for flexibility in height - don’t leave yourself not outs
Safer to use a light fill bag for easier flexibility if you didn’t get height perfect
Know your drop from prop to table with a bag, 5-7” usually, 1 ½ fists stacked, or grab a tape measure like nerdy Thomas!
Tether your bag if you can so that if it falls under movement, its still close to the table - avoid having to grab it from the ground
VIDEO SUGGESTION - Coming soon, a full suite of tripod videos in the advanced program when available…
VIDEO REVIEW:
If a picture is worth a million words, this has to help as well! Honestly nothing major here to address, just a few things
that may otherwise go undetected. The initial position is just slightly leaning forward into the rifle/prop, where you
could spread your stance wider, get closer to the prop, and keep your center of gravity directly over your feet - this
better promotes straight-rearward recoil tracking rather than muzzle rise. I do see a little muzzle flip that seems to
settle back onto target, but if you can prevent it in the first place it’ll be easier to stay focused for spotting. In efforts
of becoming more time efficient, I would suggest trying the mounted dope card (I think you’re already pursuing this).
You can keep your position on the cheekpiece and easily look up and dial the dope right next to the turret on your card.
Better yet, you can put some tape around the turret and use the paint pens to mark it directly! Very slick! The last time
saver here is to not dial windage - I’m not saying it’s the answer but it may be worth playing with more wind-holding. One
benefit of having done the head position break for dope check, is that you probably gained efficiency in target acquisition
from having to reestablish position and get on target fresh. It definitely is a little more work, so switching to a mounted
system should make it much easier in that regard - the rifle stays put where you finished the last shot while you dial the
next one. The last main point would be to really nestle in and saw down into that bag for some premium stability and recoil.
TRAINING PLAN:
Overall the goal will be to hit the range when you can, and target specific items - then beat them up until they become more fluid and natural. This will be one thing at a time, not 5 topics in one range day. It will take some discipline to stay focused even if it gets mundane, but I know you can stay on track if you want to improve!
The following section is a combination of range-day timeline AND items to work on. Take these things and try to incorporate them in a compounding way that will stack benefit on top of benefit. This is designed to give you maximum results in the areas of improvement you need.
RANGE DAY ITINERARY:
This is a general timeline of how I’d organize the range visit. Items 1-3 are all done within first 30 minutes, and then progress to the drills, targeting that day’s main focus area…
1. Review forecast before going – come up with a guess of min-max wind hold you’ll need at say 800 yds.
2. At Range - Check zero/chrono/adjust kestrel.
3. Drills – start with the cold wind call at distance.
4. Work through SOME other drills in this plan, and don’t be afraid to add/substitute what you need. Try to target your main focus area in depth, not hitting everything shallow.
5. Mid day, when the wind has the most potential, stop your other drills and repeat a full wind analysis, ending in another semi-cold call at a farther target.
6. Then, back to drill main focus area with remaining time.
7. Take notes!
DRILLS:
Cold Wind Call (Level 1 on Spotter, Level 2 on Rifle):
EVERY TRIP OUT, make this your first plan after checking zero. The hard part of this drill is that everyone loves the satisfying feeling of hitting every hundred or so, validating data. But you can do that later! The other challenge is that there’s nothing on the line, it’s not a match, so it’s easy to jump the gun and get impatient.
Don’t rush, take in every detail, study the area, and average your wind across the field of fire.
Finalize your call, and take a poke.
Hit or miss, reverse out of the shot and analyze what you could have seen better.
See if there is a single indicator you could’ve used during the shot sequence that would’ve been the best source of information.
DON’T SKIP THIS STEP - This is where the learning happens!
It’s a long term gain, sow progression drill. Things won’t necessarily change overnight, but it’ll take the already solid wind calling you have, and help you start to hone in on more specific details.
LEVEL TWO - A second level drill would be to switch to only doing this on the rifle
Give yourself a few minutes tops, then one minute, then make your first shot within 20 seconds.
800+ yards is fine, does not have to be 1000…
The Pacer: A catch-all drill that’s perfect for you!
The goal is to move slower in the shot sequence, process, and de-prioritize the bolt movement, while challenging yourself to spot and correct (the name of the game at your level!).
1. Big Small, 2 Shots – Biggest and Smallest KYL is challenging and perfect
2. Set 30 seconds on the clock – YES 30 SECONDS
3. Build position, perfect as you can, close bolt and STOP
4. When MENTALLY READY, SHOOT and STOP EVERYTHING
5. With the finger ON THE TRIGGER, speak a full sentence about what you saw and what you need to do
6. Now cycle the bolt, move to small target and STOP
7. When MENTALLY READY take the shot and FREEZE
8. Review how it went, rinse and repeat
This is training you to not rush the shot, keep spotting and processing the priority when it needs to be, and only moving on when the mental loop is completed.
Don’t let intermittent success fool you – the guys who dominate are the ones who can slow down and almost always get it right. Averaging 8 out of 10 versus 9.5 out of 10 is a huge leap, and this is the ticket…
Efficiency Drill 1:
Using this standard drill mainly to iron out your bag stability improvements and check for complete equipment control throughout…
Think of the build and break drill from the class
15 seconds, then 12 seconds, then 10 seconds…
Pick a standard target - .4 wide, non-painted steel preferred
Sturdy prop, different positions available. Pipe fence was a great example
On the clock, build a swift and complete position, and shoot 2 shots on target
Bag down, rifle down
Drive it forward while lining up barrel to target
Settle QUICK AND FIRM into the bag as you acquire target in scope
Mag well buried into bag for rudder support
Forcefully and abruptly sawed/shimmied into position in target area
Finish building connection behind rifle
Make final shimmy onto exact POA
Push out a breath as you close the bolt
Hyper focus on target, make the shot!
Spot, RESET in the bag, cycle another round, make second shot!
6. Evaluate your progress on building an effective position quicker without compromising fundamentals.
Strive to have a solid grip, saddle the rifle against your body when making big movements, and be aggressive with your strength in managing the rifle – You are in charge, not the rifle!
7. Choose another time limit, and repeat
Spotting Drill 1:
Do this for the first several shots, until you have lost the element of surprise on your wind call. Once you know confidently know where your shots are landing and where the next ones are GOING to land, you move to drill 2. Next phase will allow you to re-introduce the element of surprise to make your brain have to analyze the point of impact again from a fresh perspective… But for now:
Start on completely sturdy props and use un-painted steel
Use a big/small array, maybe a KYL Largest and then Smallest (or one of the smallest)
Make perfectly stable and bag-settled position
Take several seconds before the shot to study the target and backdrop
Prepare for expectations of what you’ll see with a hit or a miss
Depending on your vision, consider more emphasis on plate movement and statistics (how likely you expect to be over or under on your windage).
Take a shot, and freeze to see everything you can, and take a few seconds to process.
Make a measured call, not “a little left,” but “0.2 left of center…”
Take that call to a small plate and test your call.
If it hits – SUCCESS… If it misses, repeat the drill on the big plate and see if you see it better;
You will likely have a better expectation the second time because you just saw a miss in the dirt. That’s ok!
Let that guide your brain to better interpret the information down range this next shot
10. To reset the level of challenge, take the drill to a significantly different distance and repeat the drill.
Spotting Drill 2:
Taped Turret, with a buddy or alone, re-introduce the element of surprise and get yourself working hard to spot again once you’ve pretty much figured it out for the current conditions…
Have a buddy spin your windage off by up to double what the actual wind conditions call for, and down to zero wind. For example, if it’s roughly 1.0L of wind, allow for anything within 2.0L-0.0.
This simulates a big gust or a big lull in wind; a bit much, but still reasonable and good for this drill
If you’re alone, it’s less calculated
Without looking, spin your own windage a little one way, reset your grip and go the other way. A few clicks this way, that way, this way, etc… Once you feel lost, you’re set!
Cover the turret with some painter’s tape - if alone and it’s on the support side, just don’t look!
Shoot, spot, measure, correct – analyze results
Reverse dissect what you thought you saw versus what actually happened
Contrary to the fun speed stage in class, take your time. Accuracy over speed here!
Repeat this drill until you can’t miss your second shot, or you’re completely sick of it! At a minimum, do this for 5 cycles.
Free Time:
HIGHLY recommend reverting back to more scope based wind work in second half of day
Mirage is up, changes more frequent, challenge accepted!
Build a tough panning long distance stage, and put in the time to get a specific plan
Make sure you have a plan A, and a simplified plan B using simple additives per target.
Test it out and reverse engineer what you needed, vs what you saw or could improve
2. Obviously feel free to do anything else that needs work – don’t skip the tough stuff!
3. For EVERY SHOT, prep yourself with minimum correction and blind correction mentality, and IF you miss, try to make a 4-5 second correction (1st splash through 2nd shot)
CONCLUSION:
There are always more drills and beneficial methods you can use depending how you want to attack your focus areas. These are my observations and best ideas for you, but certainly not the end-all-be-all; don’t be afraid to try other things. You have good experience, a natural comfort behind the rifle, a cool head, and now some good guidance. If you definitively approach each of these little ideas, I know you’ll be able to pick up several points every day you’re out there. That could be a big chunk in a 2-day match or even a 1 day. I think you’re in a healthy spot coming into the class, and don’t have any handicaps or issues that can’t be overcome. I suggest you log your misses, track where you’re losing the most ground, and use these drills to lock in and eliminate the variables.
I’m open for a follow up if you have any questions. See below for a bonus list of highlighted items from the curriculum that I want to emphasize before your next trip out. Please stay in touch, share your victories big or small, and let’s shoot together again down the road. Thank you and God bless,
Matt Caruso
Caruso Precision
CLASS HIGHLIGHTS AND RECOMMENDATIONS
1. Get out and train sooner than later, lock in what you learned
2. Keep your attention within your thirds, G.O.D.
3. Stick to your processes, in every phase of the day/match/stage/shot sequence; don’t cut corners
4. Drill your weaknesses even if it’s less fun – “don’t skip leg day!”
5. First shot = most important shot… make it perfect!
6. Don’t settle for bad wind angles, use an azimuth or good compass for exact numbers
7. After a stage, reverse math the wind to derive true wind conditions to carry forward
8. Other than checking DOPE, don’t shoot clean steal because it makes you weak
9. IMO spotting is the most important skill beyond having good fundamentals
10. Prepare spotting expectations based on target environment BEFORE you’re on the clock
11. Know your min. correction for edge miss (½ target) and blind miss (¾ target) BEFORE on the clock
12. Plan your toughest target, toughest position as a primary driver of your plan development
13. Review EVERYTHING on your rifle end to end before saying you’re ready for the clock
14. Make mental snapshot of last shot before stepping off. Finish process before chatting with buddies
15. Pause, process, plan, then execute… Do NOT rush downrange analysis
16. Corrections should have a number, not just a direction… “I was left,” vs “I was 0.4 left”
17. Move the bag and rifle separately from position to position
18. Saw into bag before every shot, it becomes muscle memory, costs no time, yields good benefit
19. Confidence = efficient time management. Take the time before the shot, or you’ll struggle afterward
20. Move quick, shoot slow